

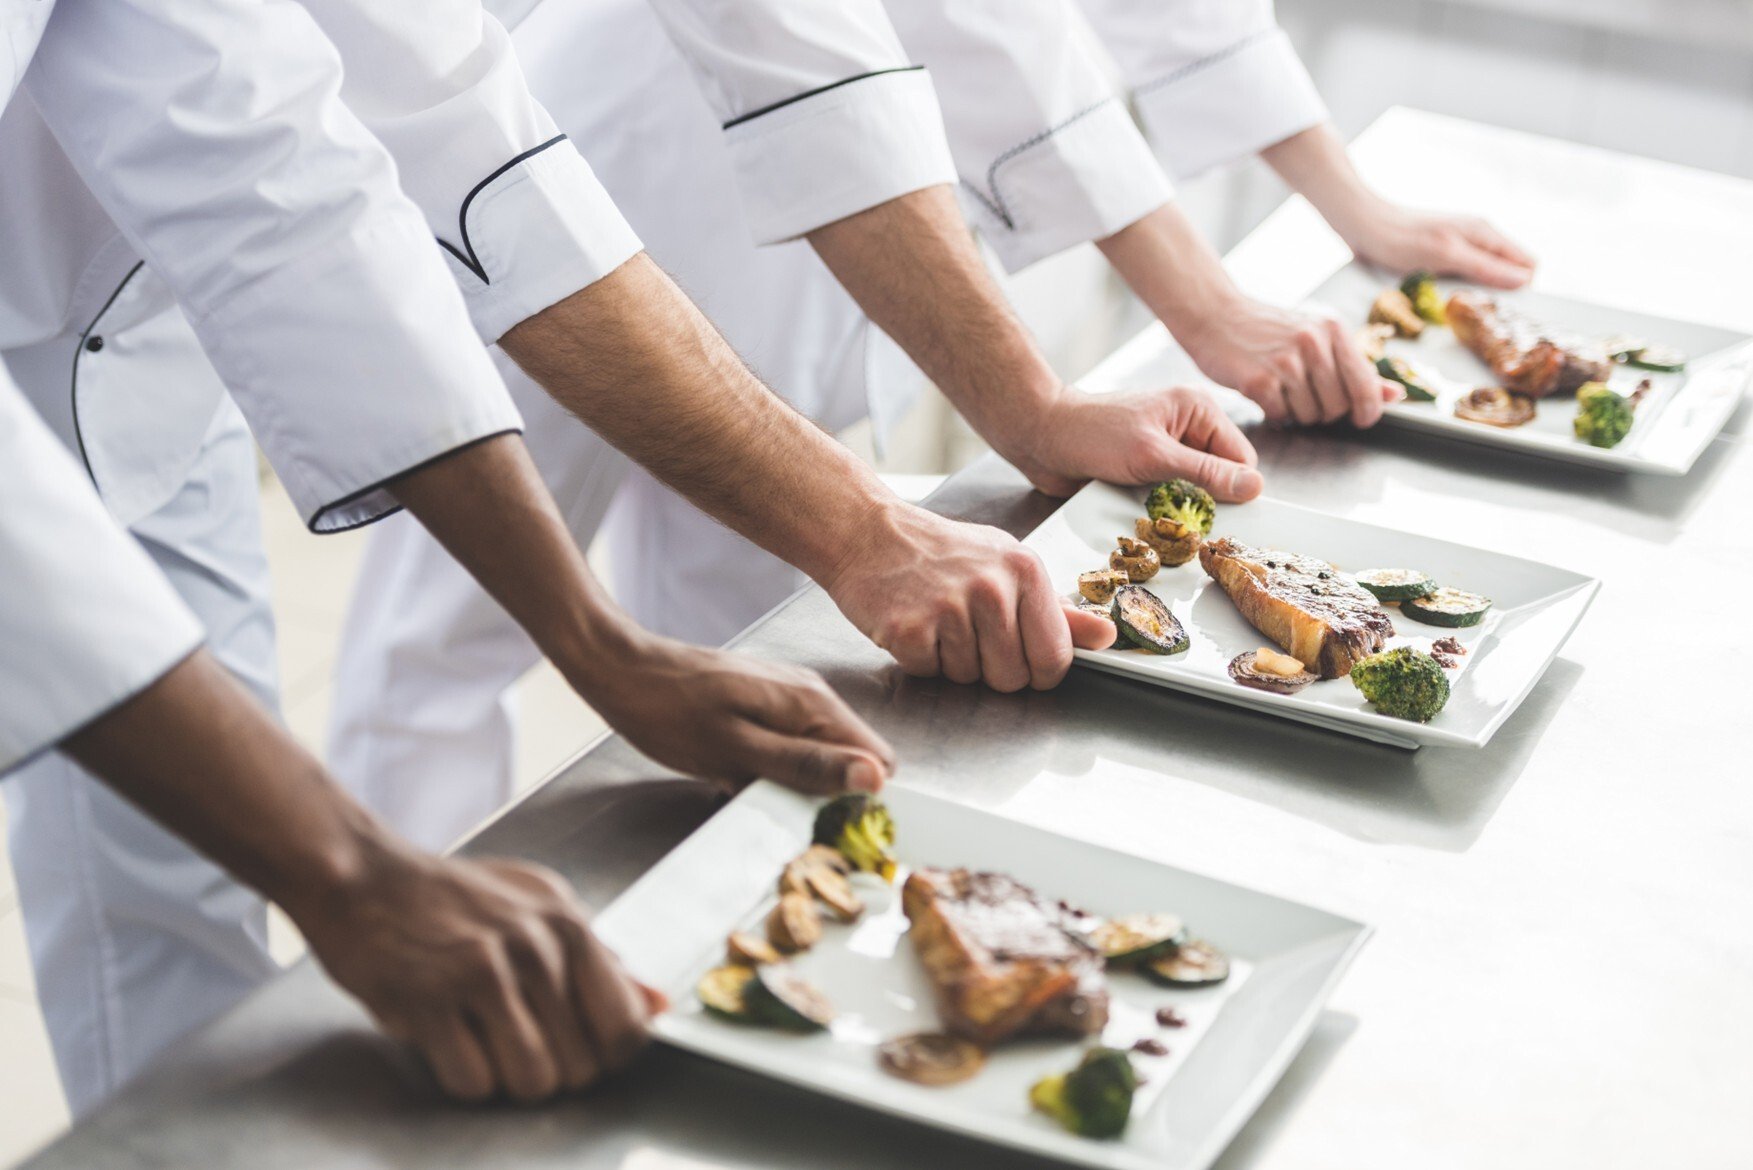
In the final part of our culinary blog series, Author-Educator-Chef John Draz talks about practical ways to have more successful lab sessions. Apply his experience to the subject that you teach, from automotive, business, and culinary to health science, welding, and beyond!
Running labs can come with their own set of challenges, so let’s take a holistic look at organizing these lab sessions.
What Are the Biggest Challenges?
Chef John Draz:
• Never enough time. You feel like you’re always up against the bell.
• Under-equipped labs. You have to take turns in the lab or there are physical space limitations.
• Teaching non-consecutive days. Students have been away from the topic and discussion, so there’s seepage. We need to bring them back to where they were when they left the class.
How Can You Overcome These Challenges?
Chef John Draz:
I had one instructor who would start class by looking at the clock and telling his students, “Say good morning to the boss.” Timeliness is an indispensable quality of a cook—and just about any worker. How do you make the best use of the little time that we have in the lab?
Manage Your Time.
• Start on time. Yes, there may be stragglers who come in late and waste as much as four or five minutes of class time. But, once they miss valuable instruction a couple of times, they will start to make an effort to be punctual. As an instructor, you only want to say things once. Punctuality is a professional skill that students need to learn.
• Consciously strive to be more efficient. As we talk about developing skills for students, start with accuracy and then advance those skills by maintaining accuracy and adding efficiency. Instill that goal in your students. It will help them not just in their education, but in their career.
• Break your tasks or labs into multiple sessions. Can you start two or three days ahead? Can you do different steps along the way, in more than one lab session?
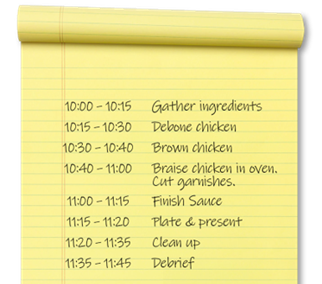
• Have students create an itinerary. Create a timed plan for how students will use their time in the lab beforehand. It's a powerful tool—and something that I was taught to do as a student. There's an example below.
BEFORE the Lab Session
Critical to success in the lab is mise en place—French for “everything in place.” It is a philosophy to live by. When we look at a lab that didn't go right, nine times out of 10 it’s due to a lack of mise en place, meaning that we didn't have the right preparation. Preparation is everything. The better the preparation, the more likely you're going to be successful.
• Share the Lesson Plan. Students should come into the lab situation aware of what they need to know. They're prepared.
• Understanding. They know what recipes are going to be executed that day.
• Technique. Have they learned or mastered these techniques, or will we need time to train them?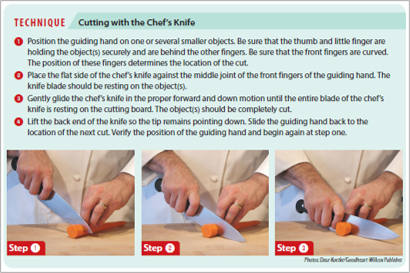
• Demonstrate whenever possible—and as close to the lab as possible. My most successful teaching was when I could lecture, demonstrate, and follow up immediately with the lab while it's fresh in students’ minds.
• Confirm that you have all the ingredients on hand—that’s part of the mise en place and part of the lesson plan.
• Communicate the desired outcome—it's important to highlight what makes a quality product.
• Instructor Mise En Place
• Handouts. Be prepared to provide them digitally or make copies of them in advance.
• Equipment. We all know that things are continually borrowed and don't get put back in place. Before your lab session starts, do a walkthrough and make sure that you have what you need.
• Workstations. Assign students a place to work rather than having them choose. Check the set up for each station—include visuals such as a diagram, map, or photo. Having a plan for each station and depicting the way it should be laid out is key, rather than leaving it to chance, interpretation, or the creativity of the students. Show them what you want and show them what's going to be the most efficient. It saves a lot of time and answers questions in advance.
• Ingredients. Like tools, do we have all the ingredients we need? One of the things that really makes for a more efficient time and more focus on teaching a technique is pre-portioning ingredients. While measurement is a valuable skill and one that we should teach, once that skill has been mastered, you may get an extra 10-15 minutes in the lab session by having product pre-portioned. Another option is to have students portion items by group. Rather than 20 different students each measuring a teaspoon of thyme, you can have one student measure the thyme, another measures the carrots, and somebody else scales out the onions. It’s more efficient.
• Student Mise En Place
Instructors should enforce the following with students:
• Preparedness. It’s what we often refer to as professionalism.
• Uniform. Do you have the right uniform for your program. Is it clean?
• Tools. Do you have the right tools?
• Workstations. Without having to be prompted, are the students able to set up their station properly? For beginning students, I think it's important that these are points that are earned towards their performance grade. You get points for your uniform, points for your knife, and points for setting up your station. Over time, this behavior becomes ingrained. In advanced classes, these need to be an expectation and rather than earning points, it becomes a deduction from the grade if they're not complete.
• Recipes. Have students read the recipes in advance. One of my colleagues came up with an effective method for doing this. Have students scale the recipe and write it out on a blank recipe sheet with the old and the new conversions. This way you know the students read the recipe in order to do the conversion and to rewrite the instructions.
• Student itinerary. Students can create one or do it as a group exercise, identifying the tasks, putting them in proper order, or prioritizing them.
List tasks.
Prioritize tasks.
Set time goals.
Post the itinerary on the work station.
It requires students to take ownership for what's going to happen and how they're going to utilize their time—it’s a great skill for the professional world, and a great skill for life.
DURING the Lab Session
• Actively observe. Organize your lab so it gives you good sight lines.
• Circulate. Provide oversight, feedback, and coaching. Go from student to student, station to station, continually walking around. You can’t get into a long discussion, but you can provide verbal feedback to bring them along.
• Enlist teaching assistants for large labs if possible, to have more than one set of hands and eyes to work with the students as they're in the lab session.
• Monitor the itinerary. You can be the verbal alarm clock! “It's 10:35. Everybody should have their chicken in the oven now. If you don't, you're behind.” “It’s 11:15. Everybody should be cleaning up.”
• Allow for varying degrees of speed/skill. Some students are very productive, very experienced, and are done early. On the other hand, we have students who continually are challenged by trying to complete things in the right amount of time. Plan a little extra time for students who may not be as experienced or as quick as others. Or, for more advanced students, keep them engaged. “Why don't you show me two different plate presentations that you could do with this dish?” Or, “Practice your knife skills.”
• Always plan for a time to evaluate the product or the lessons, and to review product.
• Build in clean-up time.
AFTER the Lab Session
Before the students leave class:
• Recap and review.
• Get feedback. The more immediate the feedback, the better it is. It's fresh in our minds.
It should be a dialogue. “Here’s what I see… What was your experience?”
What were the wins?
Where we can improve?
• Share the next lab assignment. “Complete this handout.” “Think about this technique.”
• Prepare for the next lab session. It's thinking ahead, and it’s the way we work in the professional kitchen. We're looking at the next day's service and what we can get prepared. Can we set up the stations or put the equipment in a particular order to make things quicker?
Thank you, Chef Draz, for this valuable insight!
We hope you find these lab tips helpful! If you’re looking for ways to improve the demonstrations that you do in class, take a look at Part 1 of this blog series, Building Success in Culinary Arts Education and Part 2, 10 Tips for an Effective Lecture, both by Chef Chris. Koetke. All tips can be applied to any subject! Chef Koetke’s blogs are based on a previous webinar. Chef Draz’s full webinar is available here.
Interested in a free digital preview sample of Chef Draz’s book, The Culinary Professional? Learn about this NEW edition here or request a free preview for any G-W title.
Photo Credits:
Thumbnail: LightFieldStudios/iStock.com
Image 1: The Culinary Professional
Image 2: The Culinary Professional


